I guess that at this point, the regularity by which I write blog posts that somehow relate to the Momofuku cooking might be getting kind of repetitive. It has become quite a reliable source of deliciousness for me, and it has been a great entry for me personally to become more well versed in pseudo Japanese food, especially since I generally stick to the Noodle Bar recipes. Since acquiring the book, I have been eyeing up the idea of attempting to make the ramen totally from scratch - after all, it is the fucking Super Bowl of the Noodle Bar recipes. The one blocking issue for me has always been the noodles. David Chang mentions that the ingredients are hard to find (I know that I have never come across them) so I always kept that one on the back burner. Until now. A coworker of mine was kind enough to lend me the debut issue of Chang's new quarterly called Lucky Peach. In it, I was shocked and excited to find that all that was needed for homemade ramen noodles was simple basic (see what I did there?) baking soda. I could barely wait until the weekend to get this project started. It turned out to be a nearly 2 day task to put all of this together, but I have to say it was absolutely worth it. The weekend of work was summarized by my wife at the dinner table Sunday night with a succinct summary of "dude, you made fucking ramen."

The ramen related recipes here are as follows:
- Stock
- Stock seasoning (tare)
- Roasted pork belly (chashu)
- Stewed bamboo shoots (menma)
- Noodles
- Slow poached egg (onsen tamago)
Roasted Pork Belly / Chashu
2-3 lb pork belly
¼ c salt
¼ c sugar
If the pork belly is skin on, remove the skin. Mix the salt and sugar together and dredge the pork belly in the cure mix on all sides. Cure in the refrigerator for at least 6 hours but no more than 24.
Preheat the oven to 450º. Rinse the pork and pat dry with a paper towel before roasting. Roast the belly for up to 1 hour, basting occasionally with the fat that is rendered from the belly. You are looking for the belly to brown and take on roasted color during this time. If it starts to look like it's burning, skip straight to lowering the heat. Reduce heat to 250º and roast for another hour. Allow pork belly to cool, then refrigerate until the fat solidifies. Once it is chilled, it will be easier to slice in thin slices.
Tare
1 c soy sauce
½ c sake
½ c mirin
1 chicken back or equal amount chicken bones
Roast the bones in a 425º oven for an hour or until the bones are well browned. If you can roast the bones in a saucepan without steaming them instead then do that, otherwise roast in a small open dish and when the bones are roasted, deglaze the pan with the liquid. Simmer for an hour, until the liquid is slightly reduced and thickened.

Stock
So some background on this... The Momofuku cookbook has a ramen recipe, but Lucky Peach featured Momofuku Noodle Bar's "Ramen 2.0" recipe, where the goal was to reduce the cost of the ramen broth by making it just as flavorful without needing as much pork or chicken parts. I ended up kind of shooting from the hip here and combined the two of them because I can't leave well enough alone. I think it turned out pretty great.
3.5 lb pork necks
3 lb chicken backs or other parts
1 onion or leek roots and ends from 1 bunch leeks, washed
2 c dried shiitakes
6 quarts water
2 pieces konbu
6 oz bacon
Heat the oven to 400º. Rinse the konbu and set aside.
Start the stock by heating the water to 160º. Turn off the heat and add the konbu. Cover the pot and let the konbu steep for an hour. According to Lucky Peach this is some crazy Japanese science way to extract the most flavor out of konbu. I am not one to debate this.
As the konbu is steeping, start roasting the pork necks. Roast them for about an hour, turning as necessary, you want them to be brown but not black. Nicely roasted.
When the konbu is done steeping, remove it and discard or save for another use. Rinse the shiitakes and then add to the stock. Bring the water up to a boil and then turn the heat down until the broth is simmering. Simmer for 30 minutes.
Remove the mushrooms from the stock and add the chicken bones. Keep the water at a heat of about 180º if you can. Skim the foam and impurities that gather on the surface often. Give the chicken at least an hour (maybe more if you have the time). If you are using smaller parts then you will extract the flavor faster. If you are using whole carcasses then maybe err on the longer side.
Remove the chicken bones and add the roasted pork bones along with the bacon. Now you are entering the long part of the stock making process. Keep the water at 180º, continuing skimming, for 6-7 hours, or as long as you can feasibly do it. Remove the bacon after an hour and discard it. Add water as necessary, keeping the bones fully covered.
In the last hour, add your leeks or onions and let them steep and lend their freshness to the broth.

Strain out the broth using a cheesecloth lined colander. You may have to remove the bones by hand first if they are too big.
Here is a picture of the consistency of the stock after it has been chilled. It was seriously like jello, sooo much gelatin. So good.

Stewed Bamboo Shoots (Menma)
1 c canned or prepacked boiled bamboo shoots
1/2 c soy sauce
1 tbsp sesame oil
I found these neat boiled and packed bamboo shoots at the Japanese grocery store, so I thought it was worth taking a picture of them in their pristine state. If you are using canned bamboo shoots, just drain and mix all the ingredients and bring to a simmer. Stew for 20-30 minutes and let cool.
Alkaline Noodles
I actually ended up making 2 batches of these.
Lucky Peach's recipe called for 3 c AP flour, but I found the dough to be far too stretchy even after 2 kneading sessions. The second time, I used half bread flour and half AP for a more glutenous flour. The resulting dough was perfect - stiff enough to roll out using a pasta machine without tearing, but with enough give to remain malleable. These noodles can also be used for the momofuku ginger scallion noodles which are really awesome.
1.5 c bread flour
1.5 c all purpose flour
1 c lukewarm water
4 tsp baking soda
Heat oven to 250º, spread baking soda out on aluminum foil and bake for 1 hour. This will remove the carbon dioxide from the baking soda, leaving you with sodium carbonate - the alkaline salt that makes these noodles hold up to hot soup broth and have that slightly kind of nutty flavor to them.
Dissolve the baking soda in the lukewarm water and stir until it is fully dissolved.
In a mixing bowl, add the flour and then the water. Stir with a fork until the dough becomes shaggy, and then begin kneading with your hands. Work dough for 5 minutes, wrap with saran wrap and allow to rest for 20 minutes. Work the dough again for another 5 minutes, rewrap, and refrigerate for 1 hour.

Roll out either with a pasta machine or by hand. I used a pasta machine on the following settings. I rolled the sheets out to a thickness of 3 (that is, 3rd setting from the thinnest possible).

I then used the thinner of the pasta cutters (linguine? I don't even know - the one that is smaller than fettucine). I found that I had to start the dough through the cutters and then actually grab the end of the cut noodles and pull through as I continued to cut. If i didn't do that, I ended up getting very ratty bunched up noodles. By pulling, the noodles cut sharply and slid right through. A friend also told me that spraying a little Pam or spray canola or whatever on the cutter blades before cutting the noodles also made a world of difference when he made these noodles - I definitely plan on trying that next time.
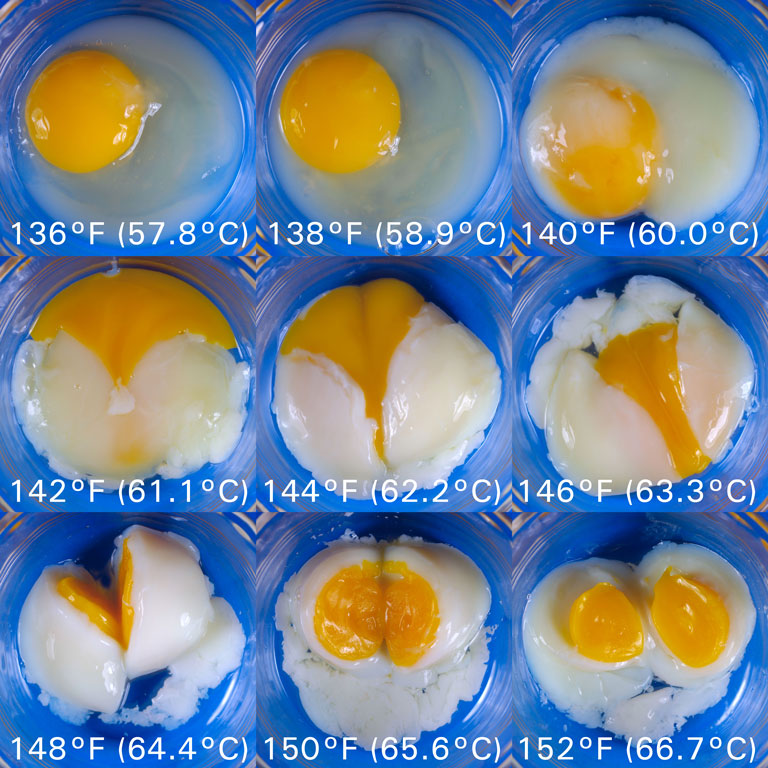
Onsen Tamago (Slow poached eggs)
Check out my old recipe for these awesome and incredibly versatile eggs:
Serving your ramen:
Ingredients:
Stock
Tare
Menma
Eggs
Thinly sliced green onion
Sheets of nori (optional)
Alkaline noodles
Pork
Ok holy shit we are almost finally to the point where you can eat. You've done all the hard work, congratulations. Now you just need to put the pieces together. It's really easy now. Boil your noodles and then drain them. Use the tare to season your ramen stock. Add water if necessary if the broth is too strongly flavored.
Place a serving of noodles in the bowl, slide a piece of nori down along the wall of the bowl. Place a few slices of pork on top of them justified to one side. Ladle hot broth over the noodles. Placed some menma on the other side of the bowl, crack open an egg and let it slide into the middle of the bowl. Top with green onions. You are finally ready to enjoy the fruits of your labor, take a deep breath and then eat the shit out of this awesome ramen.