Sunday, January 23, 2011

Cook's Illustrated Almost No-Knead Bread / Normandy-Style Mussels

So I started writing for the local site New Raleigh on a monthly basis after last month's bacon article.  I'm going to be writing monthly for them, focusing on food with a focus on showing what is available locally.  We have some great ideas to go off of, it's really exciting and I look forward to showing some of the ideas in the upcoming months.  This post is a sister post to my latest article on New Raleigh, where I make Moules Normandes, or Normandy-style mussels.

No knead bread started out as a recipe that the New York Times published in 2006.  It got a lot of attention for being a great bread to make at home with almost no work necessary on the part of the baker.  A couple years later, Cook's Illustrated decided to try to refine the recipe, and they released their version in January 2008.  They found that even a minimal amount of kneading led to better texture in the bread, and they also introduced a technique of baking the bread in this kind of 'sling' of parchment paper, which is just incredibly smart considering you would otherwise have to stick your hands in a pot that has been baking at 500º for a while.


I feel like this almost no-knead bread is a blog staple, but it's for good cause.  I've never had bread this good made at home - the crumb on the inside is light and airy, and it gets crusty on the outside like a professionally baked loaf.  It's also incredibly easy to make, you just need to plan for it a day in advance.

Cook's Illustrated Almost No-Knead Bread
(first published by http://www.cooksillustrated.com/, Jan 2008 issue)


3 cups unbleached all-purpose flour (15 ounces), plus additional for dusting work surface
1/4 teaspoon instant or rapid-rise yeast
1 1/2 teaspoons table salt
3/4 cup plus 2 tablespoons water (7 ounces), at room temperature
1/4 cup plus 2 tablespoons mild-flavored lager (3 ounces) (I used Carolina Pale Ale)
1 tablespoon white vinegar

Start by mixing the flour, yeast, and salt together in a large mixing bowl.  Add water, beer, and vinegar and use a rubber spatula to mix all ingredients into a shaggy mixture.


Cover the mixing bowl with plastic wrap and place a towel on top of it.  Keep this in a warm spot in your kitchen for 8-18 hours to let rise.  Line a skillet with a 12"x18" sheet of parchment paper that has been sprayed with nonstick cooking spray.  Turn out your dough onto a floured surface and knead 10-15 times.  Pull the edges of the dough underneath to make a neat looking ball and place that on the parchment lining the skillet.  Cover loosely with plastic wrap and allow to rise for approximately 2 hours.  30 minutes before baking, preheat the oven to 500º with a covered dutch oven or heavy pot inside.

Just before baking, dust the top of the bread with flour and make scores about ½" deep with a sharp knife.  I usually do an X pattern (if you're not now you never were!) but it really couldn't matter less.  Take the dutch oven out of the oven carefully and take the lid off.  Pick up the dough from the edges of the parchment, like a little bread hammock, and lower it into the dutch oven.  Place the lid on top and put it back into the oven.  Reduce the oven heat to 425º.  Bake with the lid on for 30 minutes.  Remove the lid and continue baking until the bread reaches 210º, about 30 minutes more.  Remove the pot from the oven and use your sling to pull the bread out of the pot.  Allow to rest for 2 hours on a cooling rack.


One of the really interesting things about this recipe is the baking covered / baking uncovered step.  In professional bakeries, they will often use steam to produce a crusty exterior.  Obviously home ovens do not have the ability to inject steam into the oven during the baking process, but by baking inside of the dutch oven, the dough emits its own steam during baking.  Keeping the steam enclosed in such a small area emulates the steam injection process, giving us the crusty exterior.  What an ingenious and important step.  Now we know, and knowing's half the battle.

Tuesday, January 18, 2011

Cinnamon and Cocoa Braised Short Rib with Mashed Potatoes and Poached Tomatoes

There was a time several years ago when I watched a lot of cooking shows on TV.  This was back when Food Network had shows like Molto Mario and when Good Eats was picking up steam.  Bobby Flay grilled on his rooftop back then instead of just challenging John Doe's to cooking competitions in backyards and more or less embarassing them in front of family and friends.  Since then, Food Network has strayed away from the shows that really held my attention, and instead of changing their programming back from cake shows, sugar challenges, and the occasional Iron Chef America and Chopped (still good!), they decided to invent a new network called the Cooking Channel.  I was excited about it at first, but the truth is that it seems to get the runoff from Food Network and it's not that interesting.  One show that has caught my attention a couple of times is Chuck's Day Off.  I hadn't heard of Chuck Hughes before, but he did just beat Bobby Flay on Iron Chef America last week, so that's cool.  I caught the end of one of his shows on the Cooking Channel where he made this short rib that I was totally mesmerized by.  It's not your standard short rib recipe - it uses red wine for the base, but the addition of cocoa, cinnamon, and star anise really transform the sauce into something else entirely.  I looked up the recipe on my phone and kept it open in a tab for months before finally getting around to making it yesterday.  It was fantastic.  A rich thick sauce with a sweet short rib and poached tomatoes to counter the richness of the potatoes and sauce.  Definitely one that I will keep around for a while.


Cinnamon and Cocoa Braised Short Ribs with Mashed Potatoes and Poached Tomatoes

Ribs:3 large onions, coarsely chopped
3 to 4 stalks celery, coarsely chopped
4 large carrots, peeled, trimmed and cut into 2-inch chunks
2 beets, peeled, trimmed and cut into 1-inch cubes
3 heads garlic, cut in half
2 sprigs fresh rosemary
2 sprigs fresh thyme
1 star anise
1 cinnamon stick
6 beef short ribs
Coarse salt
1 cup all-purpose flour
Canola oil
2 (750 ml) bottles red table wine
2 tablespoons cocoa powder
1 cup brown sugar
Handful peppercorns
1 to 2 tablespoons butter, a nub

Oil-Poached Cherry Tomatoes:
1 to 2 cups good olive oil (enough to just cover tomatoes in pan)
Pinch coarse or kosher salt
2 sprigs fresh herbs
1/2 head garlic, sliced in half
4 vine stems of cherry tomatoes

For the Ribs:
Start by salting the ribs well and then dredging them in flour, shaking off excess.  Preheat the oven to 350º.  Prep the vegetables by chopping the onion and celery and place them in a large bowl.  Peel the beets and carrots and chop into 1" pieces.  Add the star anise, cinnamon, thyme, and rosemary.  Slice the garlic heads in half, add the root end to the bowl and discard the rest.  


Heat the oil in a dutch oven over med-hi heat until hot.  Sear the ribs in batches until brown on all sides and set aside.  


Add the vegetables and turn the heat to medium.  Cook the vegetables until caramelized.  Add the short ribs back to the pot, as well as the sugar, cocoa, and peppercorns.  Pour wine on everything to cover.  You may need less than 2 bottles of wine, but if you need more, just top it off with water.


When the liquid comes to a boil, cover the pot and transfer it to the oven to braise for about 3 hours.  Halfway through I flipped the ribs to make sure they were evenly cooked.  The short ribs should be fork tender and the bone should slip out easily at this point.  I removed the ribs and strained the liquid, which will become our sauce.  Slice off the little connective-y piece from the bottom of the short rib where the bone was, it doesn't really need to be there.


To finish the sauce, pour the strained sauce into a saucepan or frying pan and reduce it by half.  It should become thick and almost the consistency of chocolate syrup.  I skimmed a lot of the gunk that gathered on top during this process.  When it is reduced, check for seasoning and add salt as needed, and then add 1 tbsp of butter and swirl it around.  That will give it the final sheen that really makes it look fantastic.


For the green beans:
Well, here is my big misstep in this recipe.  The original recipe tells us to just saute the green beans in butter/olive oil and shallots.  That would go on the short rib with the tomatoes and everything would be great.   While planning this out ahead of time, I thought that the buttery green beans + oil poached tomatoes + creamy mashed potatoes would just be too much fat.  I decided that pickled green beans would probably cut through all of the richness and end up contributing much more to the dish.  I was totally wrong about that - I feel like the pickled green beans, while good on their own, conflicted too much with the cinnamon and anise in the sauce and were detrimental to the dish.  On top of that, the reason that I decided to pickle them was to contribute some acid to the dish, but I was too dumb to realize that I was poaching TOMATOES for the dish, which are pretty much the most acidic thing out there that isn't vinegar.  I would have been better off with just the regular green beans.  Here's the recipe anyway..

1 lb green beans, woody end trimmed
1 tbsp peppercorns
1 1/4 c water
2 c white vinegar
1 garlic clove, smashed
2 thai chiles
1 tbsp sugar
1 tbsp salt

Blanch green beans in boiling water and then cool in an ice bath.  Place the green beans in a large mason jar.  Heat all remaining ingredients in a saucepan until salt and sugar are dissolved and then pour over top of the green beans.  Let cool and refrigerate for several hours.


For the tomatoes:
approx 12 cherry tomatoes
1 c olive oil
2 cloves garlic
2 sprigs thyme

Heat the oil in a saucepan over medium heat until hot.  Be careful that it doesn't reach the smoke point.  Add the garlic and thyme and let sit for a few seconds.  Add the tomatoes and poach just until they plump up and start to burst.  Remove and set aside.


Make your favorite mashed potatoes recipe and then get ready to plate..

Place the potatoes down with a short rib on top.  Spoon the sauce over the short rib and potatoes, then place the green beans on top.  Add the tomatoes and serve.


Aside from my green bean misstep, this was a really successful dish.  The sauce was really fantastic, the short rib was sweet and delicious, and the tomatoes contributed an acidic touch to the dish.  The fact that this is a red wine based dish with two whole bottles is really mystifiying because the resulting sauce has very little actual wine taste to it.  The spices and sugar added to it transform it and make it taste like something new, which was really interesting to learn from this recipe.

Monday, January 10, 2011

Perfect Poached Eggs: An Experiment (eggsperiment?)

I don't quite have a perfect way to make poached eggs.  Usually when I make poached eggs at home, they always come out irregular and imperfect.  It's purely aesthetic, they are still perfectly fine, they just don't look perfect, and sometimes that bothers me.

I have been reading the book Molecular Gastronomy:  Exploring the Science of Flavor by Hervé This and it sparked an idea in my head:  perhaps I could use the teachings from the book to help make a consistently visually perfect poached egg every time.  First off, the book is a great guide to some of the science behind cooking.  When I thought of the title "Molecular Gastronomy," I immediately assumed that it would about like thickening things with agar agar and making foams and shit.  The book is nothing like that though:  it's not a recipe book, it is an explanation of science - how cooking and chemistry work together, how we taste and how we sense food.

He explains in a chapter about hard boiled eggs that the proteins in the whites and the yolks denature (set) at different temperatures.  Whites denature at a temperature of 144º while yolks set at 154º.  In the case of hard boiled eggs, you could keep your eggs in water at a temperature of 154º and not overcook the yolks, which would lead to that sulfurous mealy mess that overcooked hard boiled eggs suffer from when they are cooking in boiling water for too long.

The purpose of my experiment was to get a perfect looking poached egg by using the shell to contain the poached whites before breaking the shell, thus resulting in a perfectly shaped poached egg.  I started by heating the water up to 140-145º and then submerging an egg in the water.  I let that sit for 20 minutes.  I don't know why I chose 20 minutes - I wanted to make sure that the whites had enough time to set, and I started with a cold egg, so I erred on the side of safety.  I guess that, in theory, you could leave it for a while as long as the temperature doesn't change, because the yolks would never get hot enough to set.  I don't know what that would do to the texture of the whites though - would they ever reach the rubber consistency if you keep them at a low temperature?


After 20 minutes, I removed the egg and the thermometer and turned the heat up to get the water to a slow boil.  I added about 1 tbsp of white vinegar, a standard addition for any poached egg recipe, just to make sure that the white set.  Then I cracked the egg into a shallow dish.  The white was partially set - like a gel.  The outside had been set enough that it didn't run, but it was still very very soft to the touch, which is what I really wanted.  I then poached the egg in the water as if I were poaching it normally.  When I dropped it into the water, it immediately coagulated and stayed together - promising!  No unpredictable spreading whatsoever.  I let it poach for about 3 minutes, which as it turns out, was a bit too long.  If 20 minutes allowed the full egg (white and yolk) to come up to a temperature nearing 144º, then there is no reason to put the egg in 212º water for more than just a minute or so.  Theoretically, the whites have probably fully denatured, and leaving it in for too long just raises the temperature of the yolk to the point where it begins to set.  At that point, I just want the second poach to fully solidify the outside of the whites, so it should really be almost like a blanch.


juuuuust a bit over...
One of the great things about this technique is that it can be prepped.  You could parcook the eggs in the shell, immediately rest them in ice water, and reserve them for later.  Then, when needed, you could just bring the second poach up to the boil and allow them to finish very quickly before serving.

In the end, I think that the experiment was a success and that the technique worked as I expected, although it's probably a bit overkill for Sunday brunch eggs benedict or whatever.  I will keep this one in my back pocket for times when the poached egg is the star of the dish and I want it to look perfect.  Next time I do it, however, I will make sure not to leave the egg in the second poach for longer than just a minute or so.


Monday, January 3, 2011

Prosciutto, Basil, Sun Dried Tomato and Egg Stuffed Bread

New Years is a holiday that should be filled with food.  There are various regional traditions for New Years in the United States that I have crossed paths with, such as collards and black eyed peas in the South or pork and sauerkraut in the Eastern European neighborhoods of Chicago and Pittsburgh.  I have no specific traditions but I think that this recipe has somewhat evolved into a tradition for my wife and I.  We have made it for the past couple of years and it is a great thing to have on New Years Day - it is an ultimate hangover cure (an obvious requirement), it's not too complex to make, and it's something that you will inevitably snack on all day long.  It's also infinitely versatile and any of the ingredients can be swapped or experimented with to find all kinds of great combinations.  After a long weekend, sitting around on the couch eating this all day was exactly how I wanted  to wrap up my holiday.


Prosciutto, Basil, Sun Dried Tomato and Egg Stuffed Bread
adapted from http://notwithoutsalt.com/2009/08/31/stuffed-bread/

1/4 lb deli ham
1/4 lb Prosciutto di Parma
5+ hard boiled eggs
1½ c shredded Fontina cheese
½ c chopped fresh basil
½ oil-packed sun dried tomatoes

4 c bread flour
little over 2 c lukewarm water
3 1/4 tsp packets dry yeast
2 tbsp sugar
1 tbsp salt

For the eggs:
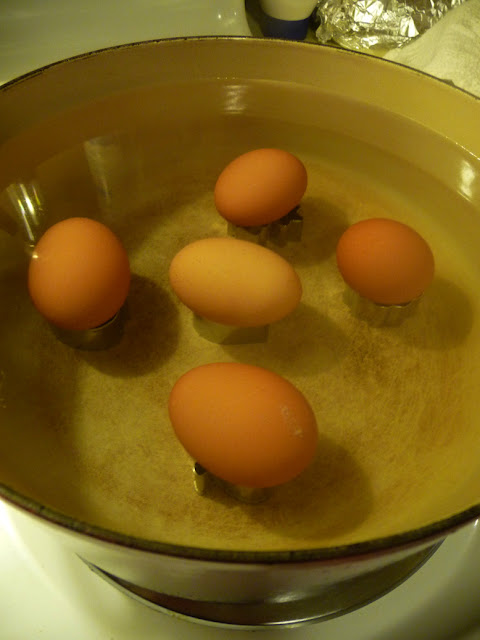
Hard boiled eggs are really easy to make as long as you follow some basic rules.  Start by placing them in cold water.  I use these small cookie cutters to place the eggs on so that they heat more evenly.  If they are left to touch the bottom of the pot, they are getting much higher heat from that surface than from the water.  Raising them allows them to cook evenly on all sides.  Bring the water to a boil and turn off the heat.  Let the eggs cool for 10 minutes and then place them in an ice bath.  They can stay there until you are ready to peel them.


For the bread:
Bloom the yeast by mixing it with the lukewarm water and whisking until smooth.  Let sit as it foams.

In a large mixing bowl, mix together the flour, sugar, and salt.  Pour half of the water into the bowl and mix with a fork to evenly incorporate flour and water.  It will begin to create a shaggy dough.  Add more water to create a wet mix, while continuing to stir with fork.  The water amount could vary - if it gets very wet, balance it out by adding more flour.  You may not use all of the water, and that's ok.  Turn out the dough onto a floured surface and begin kneading.  I had to add a fair amount of flour here to keep the dough from being too sticky.  Continue working it for 5 minutes or so, until it is a smooth elastic dough.  Place the dough in a floured bowl and cover with plastic shrink wrap and a dish towel, and keep it somewhere warm to let it proof.


It should double in size over the course of an hour or so, let it go as long as it needs to in order to double.  When it is doubled, pound it down for about 30 seconds and turn it out again onto a floured surface.  Use a rolling pin to make it into roughly a 14"x10" rectangle.  This is your basis for the bread.

For the stuffing:
Chop your basil and sun dried tomatoes into smaller pieces for even distribution.  Start by placing the ham and prosciutto down, followed by the cheese, basil, tomatoes, and lastly the eggs on top.  Grind some fresh pepper on top and maybe sprinkle a little salt if you want.


Bring it all together:
Have a small cup of water handy.  Fold one edge of the bread over the ingredients and rub the edge with some water.  Fold the other edge over and use your fingers to seal the wet edge to the edge that you just folded over.  If you would like to bake it in a ring, have a baking sheet with a silpat or oiled parchment in it ready to go nearby.  Place it next to your sealed dough and bring it onto the baking sheet by segments, curling each piece as you go.  You won't be able to lift the whole thing up and lay it down as a ring at once, so doing it incrementally allows you to create the ring shape without tearing the dough in the process.


Cover your stuffed dough and allow it to proof for another 30 minutes or so.  Preheat the oven to 350º while you wait for the second proof to happen.


As you can see in my pictures, I think I let it go too long because my ring all but disappeared.  Don't forget that it will puff in the oven as well.  There's a fine line between not allowing it to proof enough; thus ending up with dense dough, and letting it go so long that you lose your pretty shape.  Next time that I make this, I will probably try to let it proof a little less to account for how much it will expand in the oven.

When the dough has risen enough and you are ready to begin baking, beat one egg and brush the top of the dough with your egg wash.  Sprinkle a little kosher salt on top of the bread as well.  The egg wash will give it a really nice golden sheen during the baking process, it really makes it look great coming out of the oven.  Bake for approximately 30 minutes, or until the top of the bread is golden and starting to brown just a bit.  Remove from the oven and allow to cool for at least an hour.


I served it with a little bit of olive oil for dipping.  All in all, it's a few hours work but it is so well worth it and the snackability is amazing with this little guy.  You can easily reduce the time by making the dough the day before or so and just refrigerating it - then all you have to do is roll it out, stuff it, and bake it.  The sun dried tomatoes really make this bread amazing by balancing out the creamy egg and the salty ham.  The fontina melts so well that it almost turns into a sauce when it mixes with the oils released by the prosciutto, and the basil adds just a bit of fresh herb punch against the starchy bread.  Fantastic.