Saturday, May 21, 2011
Some design changes...
I updated some of the design stuff of the blog? I would like to acquire a logo too. Hopefully something cool with zombies and blood and guts and other good stuff... with any luck, I'll have something soon! Is the new color stuff better or worse than what I had before?


Tacos de Papa (Fried Potato Tacos)
In late 2009, one of my favorite food related magazines, Gourmet, closed its doors with next to no notice. Publisher Conde Nast cited declining advertising sales and customer interest shifts as their reasoning behind the unexpected closure. I can't argue their financial reasoning for closing the magazine, but from a reader's perspective, the closing of Gourmet left a huge void in magazine publications. Gourmet was great for taking me out of my apartment and putting me somewhere far away. It inspired me to want to travel, it showed me the amazing food that exists in faraway places, provided some of the best recipes that I have, and the photography was the best in the business in my opinion. Instead, Conde Nast kept Bon Appetit alive to cater to boring housewives with 15 minute dinners and their annual burger issue with just enough variation in the recipes to not call it a reissue. But I'm not bitter or anything.
Stepping up to the global cuisine periodical plate, Saveur magazine has become the next best thing to Gourmet. Perhaps it doesn't bring me to the same daydream state that Gourmet did, but it often comes close. This month's issue (#138) had a great article about the author's visit to his home state of Zacatecas in Mexico with some amazing photography and great looking recipes. Saveur also is very free with its recipes and articles, and despite this issue still being available at newsstands, you can already read the full thing online here (http://www.saveur.com/article/Travels/Mexico-Feeds-Me). In a day and age where people like Christopher Kimball from America's Test Kitchen (and his subscription-only site) openly challenges the quality of food blogs and boldly considered them to be the reasoning for the fall of Gourmet Magazine (http://www.nytimes.com/2009/10/08/opinion/08kimball.html?_r=1), I commend James Oseland and the Saveur staff for accepting the open paradigm of the internet and still seemingly finding a way to run a profitable company. In this month's issue, the recipe that immediately stood out to me was a taco stuffed with cumin-spiced potatoes and then pan fried to get a crispy shell, dressed with salsa roja, cabbage, and cotija cheese. Maybe it was the photo on the cover, but we had to try these as soon as possible, so I set out to recreate the magazine's recipe. It's easy to make, it's cheap, it lasts for several days, and it is vegetarian (easily vegan too!). This one will undoubtedly go down as a regular in our house.

Tacos de Papa
(Saveur Magazine issue #138, also found here but mine is better =D)
1 tbsp finely chopped cilantro
1/2 tsp dried oregano
1/2 tsp sugar
2 ripe tomatoes, cored (+1 for topping)
2 red jalepenos, stemmed
1 clove garlic, smashed, plus 2 cloves, minced
1 tbsp unsalted butter
1 lb russet potatoes, peeled
2 tsp kosher salt
1 tsp fresh ground black pepper
1 tsp ground cumin
1/2 c canola oil
18 corn tortillas
thinly sliced green cabbage and tomatoes and crumbled cotija cheese, for serving
Puree cilantro, oregano, sugar, tomatoes, jalepenos, smashed garlic, and 2/3 c water in a blender until smooth; set salsa aside.

Bring a medium saucepan of salted water to a boil, add potatoes, and cook until tender, about 25 minutes. Drain potatoes and transfer to a large bowl. add minced garlic, butter, salt, pepper, and cumin, and mash until smooth. Set potato mixture aside. It should be crumbly, but form-able.

I found that it was easier to deal with the tacos by heating them up first. Microwave the desired number of tortillas for anywhere from 30 seconds to 1 minute. They should be malleable without cracking. If they are still stiff, microwave for a few seconds more. Heat oil in a 12" skillet over medium-high heat. Using a spoon, spread a layer of potato mixture in the middle of each tortilla. Gently cup tortilla in one hand, press the potato mixture down with the back of a spoon, and fold in half with your hands. Pressing the potato mixture helped it from falling out of the taco during frying. Working in batches, add tacos to oil and fry, turning once, until golden brown and crisp, about 3 minutes.
Stuff cabbage, tomatoes, and cotija into tacos; drizzle with salsa before serving.

Monday, May 16, 2011
Garden Update: It Lives!!
Ok this post is exciting (for me anyway). North Carolina has had a very mild spring to date - temperatures in the 70's and frequent rain have apparently made nature very happy over the past month or so. Our little garden is no exception. Last week I posted about a joint collaboration between ourselves and our duplex neighbors - a little box garden in our front yard. All of our growing hopes and dreams are contained in a small 10'x10' cube of reclaimed wood. We planted last week with the hopes that something, anything, would grow. Our contingency plan was a handful of tomato plants that we felt would at least give us something to be excited about provided that the rest of the garden was an utter failure. Well, it turns out that we must have done something right, because this weekend resulted in the sprouting of several of our seeds! The black eyed peas came first, unraveling themselves and stretching out on a sunny Saturday morning. We also saw the very beginnings of our lettuce coming up, as well as some very small beet greens. Just 24 hours later, the beets were popping up all over and the Kentucky blue pole beans were also coming up for some real sun. As it stands now, the only things that haven't showed a sign of life are the peppers and carrots. I'm hoping that they decide to make an appearance - I really want poblano peppers! Also, I picked up 2 more planters to place next to our box garden because I decided that I need to grow okra this summer. They have been seeded, so hopefully they do as well as everything else thus far. Seeing as this is my first personal garden, I am incredibly excited at all of these developments. It's so exciting to walk outside and actually see hourly changes in the garden - sprouts coming up, beans unraveling and beginning to show leaves, it's amazing to watch unfold. It's going to be a great summer.
 |
| Black Eyed Peas |
 |
| Kentucky Blue Pole Bean - just waking up |
 |
| Kentucky Blue Pole Bean |
 |
| Lettuce |
 |
| Chiogga Beets |
Wednesday, May 11, 2011
Summer garden season
So spring in the south is in full swing. It has been a really mild spring, lots of rain and lots of 70 degree days, which I am all about. For a couple of summers now, my neighbor Bruce and I have threatened to start a garden in the front yard, but we never got around to it. This year we fell on the same page and decided that we needed to actually get the garden set up. Bruce was able to acquire some 2x6's (and one 2x8) from a friend and we cobbled together a raised bed for our garden. We started by choosing the part of the lawn that gets the most sun throughout the summer, which also is probably the most out-of-the-way spot in the lawn, which is a nice coincidence. We laid out a squarish section about 10'x12' and dug as far down as we could to clear the grass and get some topsoil turned up. Unfortunately we are planting right near a maple tree, so roots were abundant and we weren't able to turn up a lot of previously existing topsoil. We discarded the grass chunks and got a good gauge of how much we needed to fill.


Now it was time for planting! Neighbor Mike was kind enough to give us 2 Mater tomato plants, and we picked up some cherry and Cherokee Purple plans as well. In our small space, we managed to plant the following:


From there, Bruce was able to borrow a friend's pickup truck to get the majority of our fill. Our neighbor Mike made a great suggestion to check out the city yard waste department, where we got a full pickup truck worth of very fine mulch for only $15. We complimented the mulch with about 150 lb of composted topsoil, some GardenTone fertilizer, and some lime (more suggestions from Mike). We mixed everything in and watered it well and let it sit overnight.

Now it was time for planting! Neighbor Mike was kind enough to give us 2 Mater tomato plants, and we picked up some cherry and Cherokee Purple plans as well. In our small space, we managed to plant the following:
- Black eyed peas
- Carrots
- Lettuce
- Thai chile (1 plant probably)
- Poblano chile (gotta have them chile rellenos)
- Fennel
- Kentucky Blue Pole Beans
- Chiogga beets
- Thai basil
No doubt it is a lot of stuff to grow in a small area but we are not totally convinced that we will succeed on all fronts. Everything's seeded now, so we just wait to see what happens and hope for the best!


Thursday, May 5, 2011
Vietnam
Almost 3 weeks since an update but I hope that this post will make up for it! My wife and I had an amazing trip to Vietnam that was full of good food and memorable experiences. Our trip started out in Ho Chi Minh City, where we visited the War Remnants Museum and checked out a large indoor market that was flooded with people. The latter photos were taken from one restaurant that really turned out to be a letdown. I was really happy with the photos but I think that they are a classic case of food photography looking better than it tasted. It certainly had us worried, but after making the flight up to Hoi An, our food fortunes turned for the better. Ho Chi Minh, in general, felt like a newer sprawly city. It very easily could have just been a combination of culture shock and jet lag, but we didn't love Ho Chi Minh City. It was interesting for sure, but after visiting the other spots in our trip, I would have to say that I wouldn't put it at the top of my list of places to return to in Vietnam.
 |
| Pho in Ho Chi Minh City, first meal of the trip and it was a good one |
 |
| Ben Thanh Market, Ho Chi Minh City |
 |
| Ben Thanh Market, Ho Chi Minh City |
 |
| Shrimp grilled on sugarcane, Ho Chi Minh City |
 |
| Green Papaya and Shrimp Salad, Ho Chi Minh City |
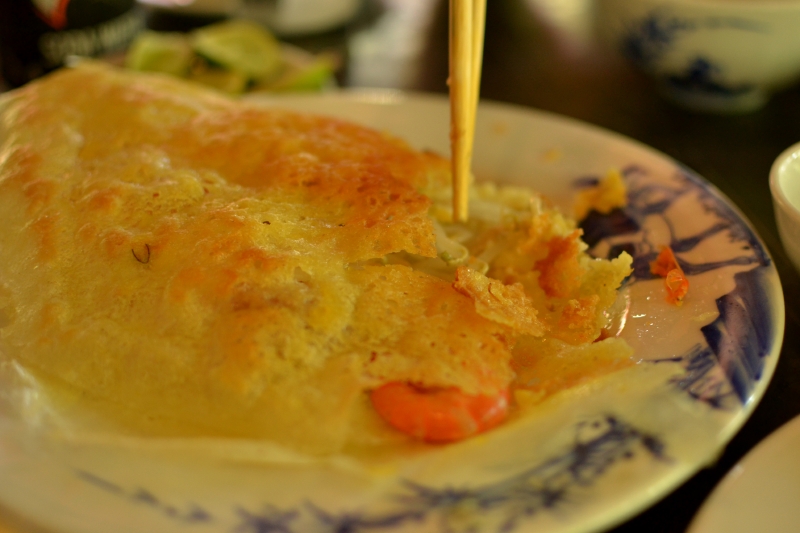 |
| Banh Xeo, rice crepe stuffed with shrimp and bean sprouts, Ho Chi Minh City |
From Ho Chi Minh City, we caught a flight to Hoi An, where we spent the most time of the trip. Hoi An is an amazing little port town dating back to the 15th century. We had some great local specialties including Cau Lau, White Roses, and these little wonton guys with shrimp and tomato sauce on them.
 |
| Shrimp and Tomato Sauce on a Fried Wonton, a Hoi An Specialty. Miss Ly's, Hoi An |
 |
| "White Roses," rice dumplings stuffed with shrimp and pork, a Hoi An Specialty. Miss Ly's, Hoi An |
 |
| Roasted Pork Spring Rolls with Fish Sauce. Miss Ly's, Hoi An |
 |
| Cau Lau (Noodles with Pork, Wonton Croutons, and fresh herbs), a Hoi An Specialty. Miss Ly's, Hoi An |
 |
| Hoi An Banh Xeo, stuffed with pork and bean sprouts and served with sliced green bananas. Mermaid Restaurant, Hoi An |
 |
| Clay Pot Fish cooked in Caramel Sauce with Pineapple. Mermaid Restaurant, Hoi An |
 |
| Squid stuffed with ground pork. Mermaid Restaurant, Hoi An |
 |
| Tea fields in the mountains west of Da Nang |
 |
| Fresh pineapple growing along a trail that we walked |
 |
| Beef, onion, and pineapple and egg omelette. Hien/Prao |
 |
| Fish cooked with tomato sauce. Hien/Prao |
 |
| Small sampling of local brews. The Aquafina bottle is home made rice wine that was similar to sake but with more burning flavor. |
 |
| A cafe where we stopped for coffee along the Ho Chi Minh Trail highway, South of Prao |
 |
| Rice Paddies west of Hoi An |
 |
| Fried pork spring rolls with fish sauce, Coco Restaurant, Hoi An |
 |
| Fish grilled in banana leaves. Coco Restaurant, Hoi An |
 |
| Fried crab in tamarind sauce. Coco Restaurant, Hoi An |
 |
| Frying at the table |
 |
| Noodles and the bowl of dill and green onions |
 |
| Bowl ready to eat |

Tuesday, April 12, 2011
A center opens to the unknown
Final post of April - I am headed to Vietnam with my totally awesome wife for a much anticipated 2 week belated honeymoon. Food will be eaten and pictures will be taken, I just hope that our terrible Vietnamese is sufficient and the bottled water is safe! I'm planning to have a big posting when I get back so stay tuned!
Braised Country Style Pork Ribs, Smoked Tomato Broth, and Mushroom Farro
Well, first of all, my apologies for not putting up anything recently. Things have been hectic at brains4brunch hq and I haven't had as much time to dedicate to blogworthy things as I would like. I am excited about this recipe though. Every once in a while I come up with a recipe idea in my head that gets me really excited, and this one definitely had that for me. I wanted a rich pork dish with a light broth - I was inspired for this dish by a dish that I had last year at Eleven in Pittsburgh - it was a very simply grilled salmon fillet over mashed potatoes with a really light tomato water. It was one of those things that wasn't the course I was most looking forward to on the tasting menu, but it ended up being memorable because it was so well executed. In fact, out of all of the dishes I had in that tasting, it was the one that stuck with me. I wanted to make my own tomato brothy watery thing, but paired with pork, so I needed something a little more robust. Smoking tomatoes paired with nutty farro and rich pork seemed like a great combination. I wanted to use pork belly, and honestly if I made this again, I would go through the hoops necessary to get some pork belly for it, because I think it really would have made a big difference. So keep that one in mind if you're feeling adventurous.

Smoked Tomatoes:
4 beefsteak tomatoes, cut in half and seeded
1/2 c chicken stock
4 sprigs parsley
4 sprigs chives
1 tbsp cold butter
Ribs:
6 country style pork ribs
2 tbsp salt to 4 cups water
1/2 onion, sliced
1/2 c dry white wine
Roughly 1.5c chicken stock
350 1.5 hours
Mushroom Farro
4 oz fresh mushrooms
1 oz dried porcinis
1/2 c diced onion
chicken stock
2 c farro
For the tomato broth:

Cut the tomatoes in half and pull the seeds and the tomato jelly stuff out with your fingers. Set up your smoker at 200º or use a charcoal grill with indirect heat. Smoke the tomatoes gently, only for about 20 minutes or so. They should smell smoky but should not be broken down or roasted or anything. Remove the tomatoes and place them in a blender. Blend until pureed and then strain into a saucepan using a fine mesh strainer. Add in the chicken stock and bring the broth to a simmer. Taste it and adjust if necessary... It should taste smokey but not overpowering. Add chicken broth to dilute if necessary. To finish the broth, quickly blanch the chives and parsley in the broth, they will brighten the broth up and help it to become a refreshing finish in the dish. Blanch them for only a couple of minutes and then remove them and discard. Add the butter and whisk it in to soften the flavor just a bit. Season with salt as necessary, and set aside.

For the ribs:
Preheat the oven to 350º. Salt and pepper the ribs liberally and saute in a pan over med-hi heat until brown on all sides. Saute in batches if you need to, make sure they don't steam. Set the ribs aside and add the sliced onions and deglaze the pan with the wine, scraping up all the brown bits. Let simmer for about 2 minutes and then add the herbs. Add the ribs back to the pan and cover with chicken stock. It might not take all 1.5 c, just pour to cover all of the onions and most of the ribs. Bring the ribs to a simmer, cover, and place in the oven. Rotate the ribs around and flip them about 45 minutes in, cover, and let braise for another 45 minutes. The ribs should be falling apart - if they are not, continue braising until they are. After it's done braising, strain the braising liquid and discard the solids. Set the liquid aside for now.


For the Farro:
Farro is a great grain - tastes good and is really good for you. I'd like to start using in my cooking more often. It's also easy to prepare. Start by soaking the farro for 8 hours if you can. Strain after soaking and let it drain in a colander while you prep the rest of the ingredients.

Boil a cup of water and adding the dried porcinis to it. Let them steep for 20 or so minutes. Dice the other half of your onion that you didn't use in the ribs and saute it in a pan with some butter. Add the fresh mushrooms and saute until most of their liquid is released. Add the farro and the chicken stock and bring to a simmer. Gently simmer for about 30 minutes, until the farro is cooked through but not mushy. It should still have a fair amount of bite to it. Drain the simmering liquid off, and add in the chives. Season to taste with salt and pepper.

Plate by scooping a serving of farro in the middle of the plate. Place a rib on top of the farro and spoon some of the braising liquid over the ribs and farro. Spoon your smoked tomato broth around the outside of the dish - you probably want to use about ¼ c per dish - just enough to lend the smokey refreshing taste to the hearty farro and pork. Enjoy!

Subscribe to:
Posts (Atom)